Why Try a Via Ferrata?
A via ferrata lets you move through steep rock using fixed cables, metal rungs, and bridges while clipped to a safety line. Born in the Alps and widely expanded during World War I in the Dolomites to aid troop movement, these “iron paths” now offer adventurous routes for the public (historical references: Italian and Austrian Alpine sectors, late 19th century onward). You get exposure similar to climbing, but with continuous protection and engineered steps.
You feel the limestone cool under your fingertips as the valley opens beneath your boots. For hikers, a via ferrata is a next step into vertical terrain without needing full climbing skills. For climbers, it’s a scenic, efficient way to cover ground and reach viewpoints, often in half a day. It works for active tourism, learning basic movement on rock, or simply tasting controlled exposure.
In this guide, you will learn what a via ferrata is, the key elements you’ll use, how difficulty levels work (K1–K6 and equivalents), and the essential via ferrata equipment. You’ll get step-by-step techniques, safety advice, practical checklists, and beginner-friendly options in Spain. If you want a structured first experience with the right mindset and respect for the landscape, keep reading.
Source notes
Standards for via ferrata sets are defined in EN 958:2017 and UIAA 128; helmets and harnesses follow EN 12492/UIAA 106 and EN 12277 respectively. Petzl Technical Notices and UIAA Safety Standards provide practical guidance.
Picuco te puede ayudar
Does something here catch your eye?
Tell us.
Write to us on WhatsApp or email: we answer questions, find the best options and help you sort out the booking.
Key Elements and Plain-language Terms
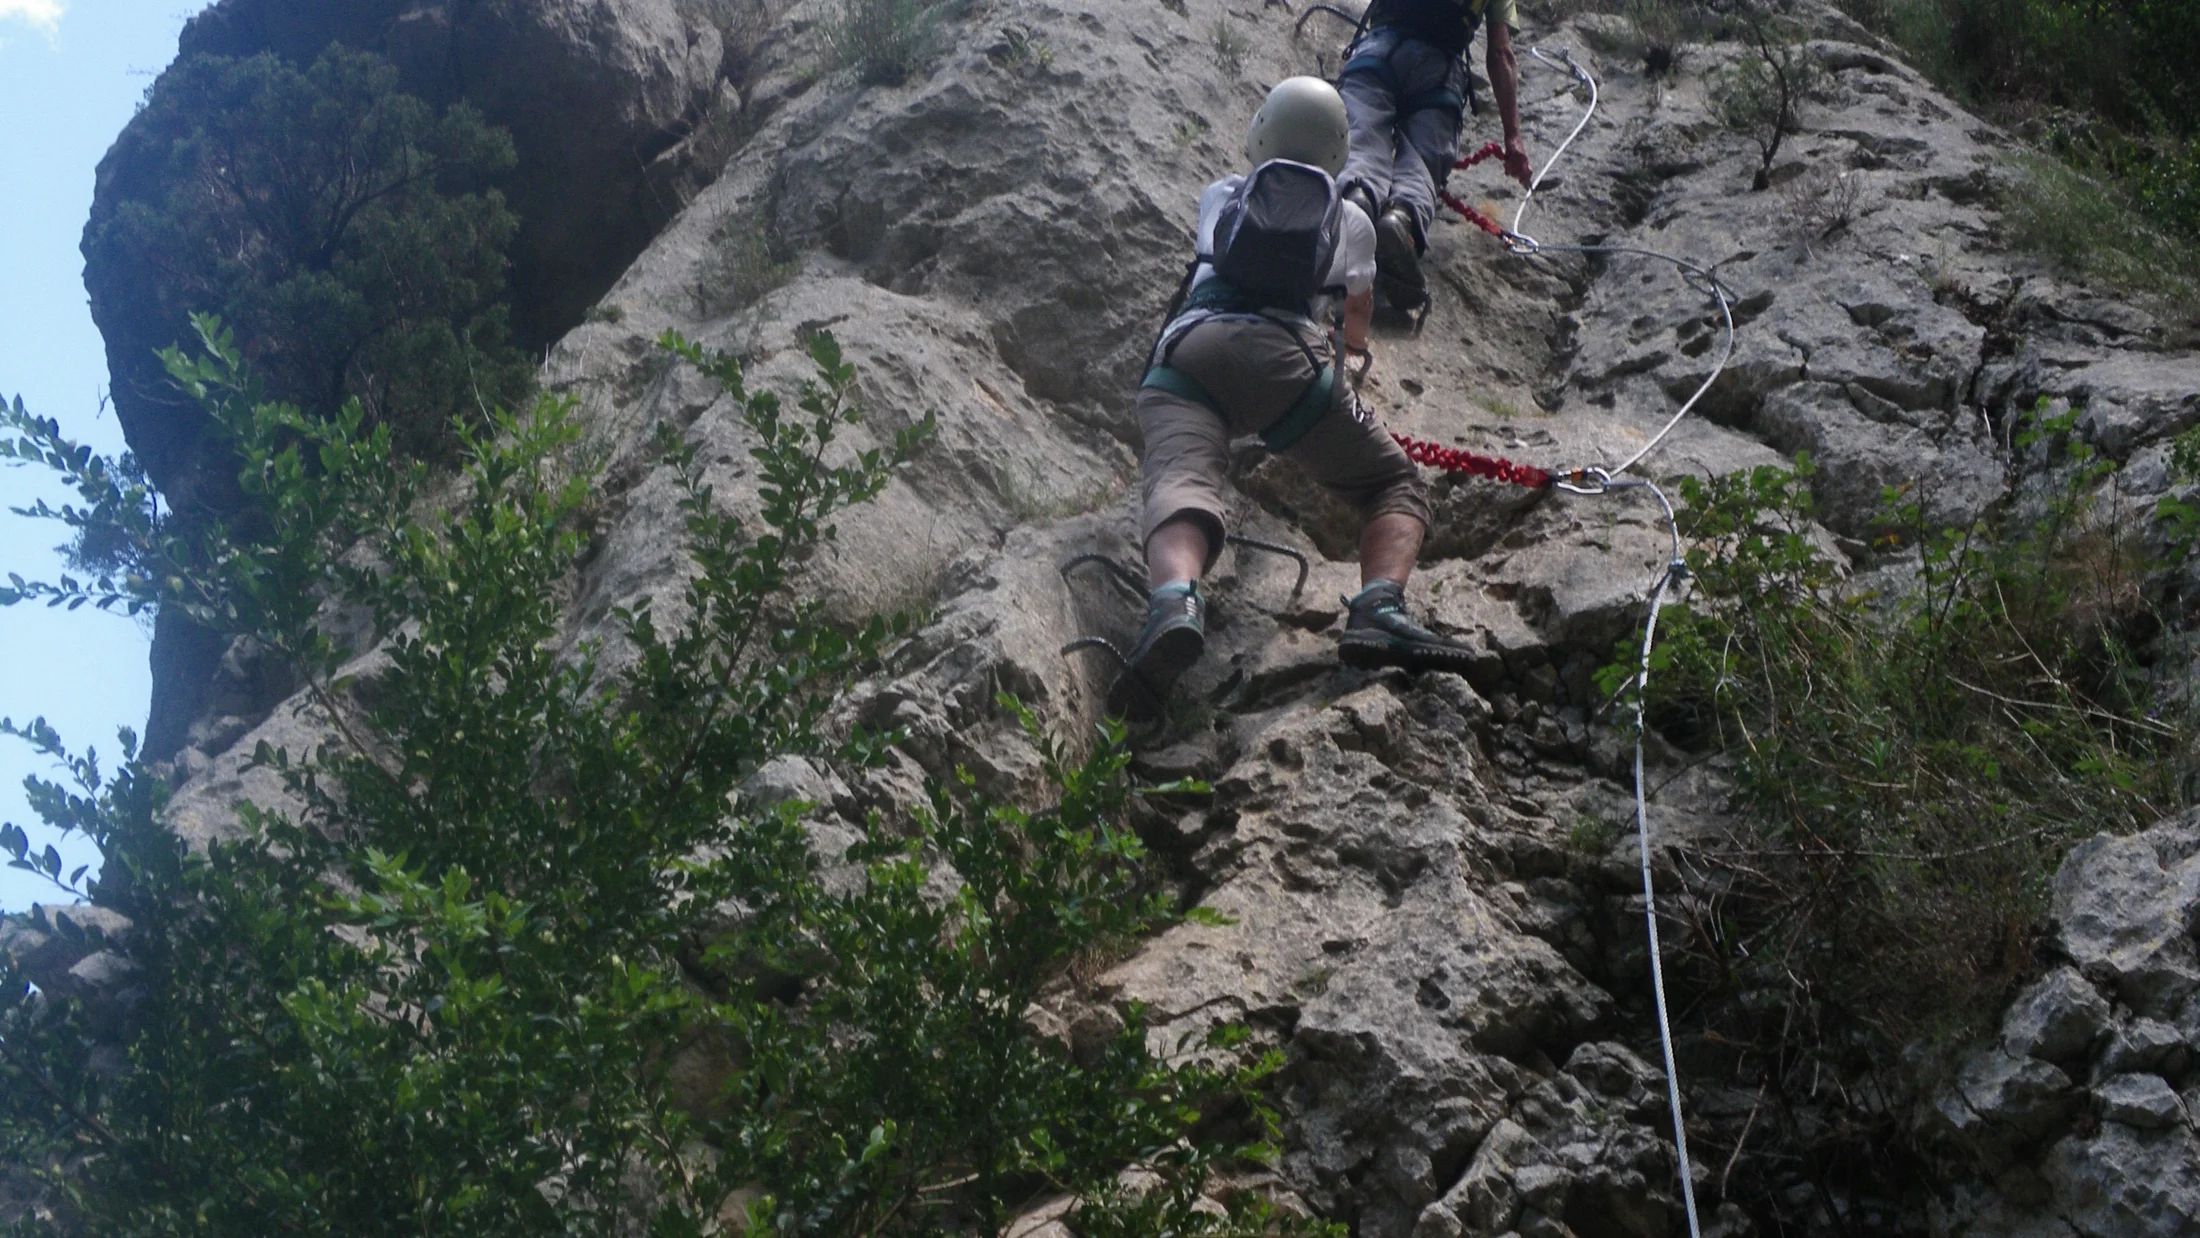
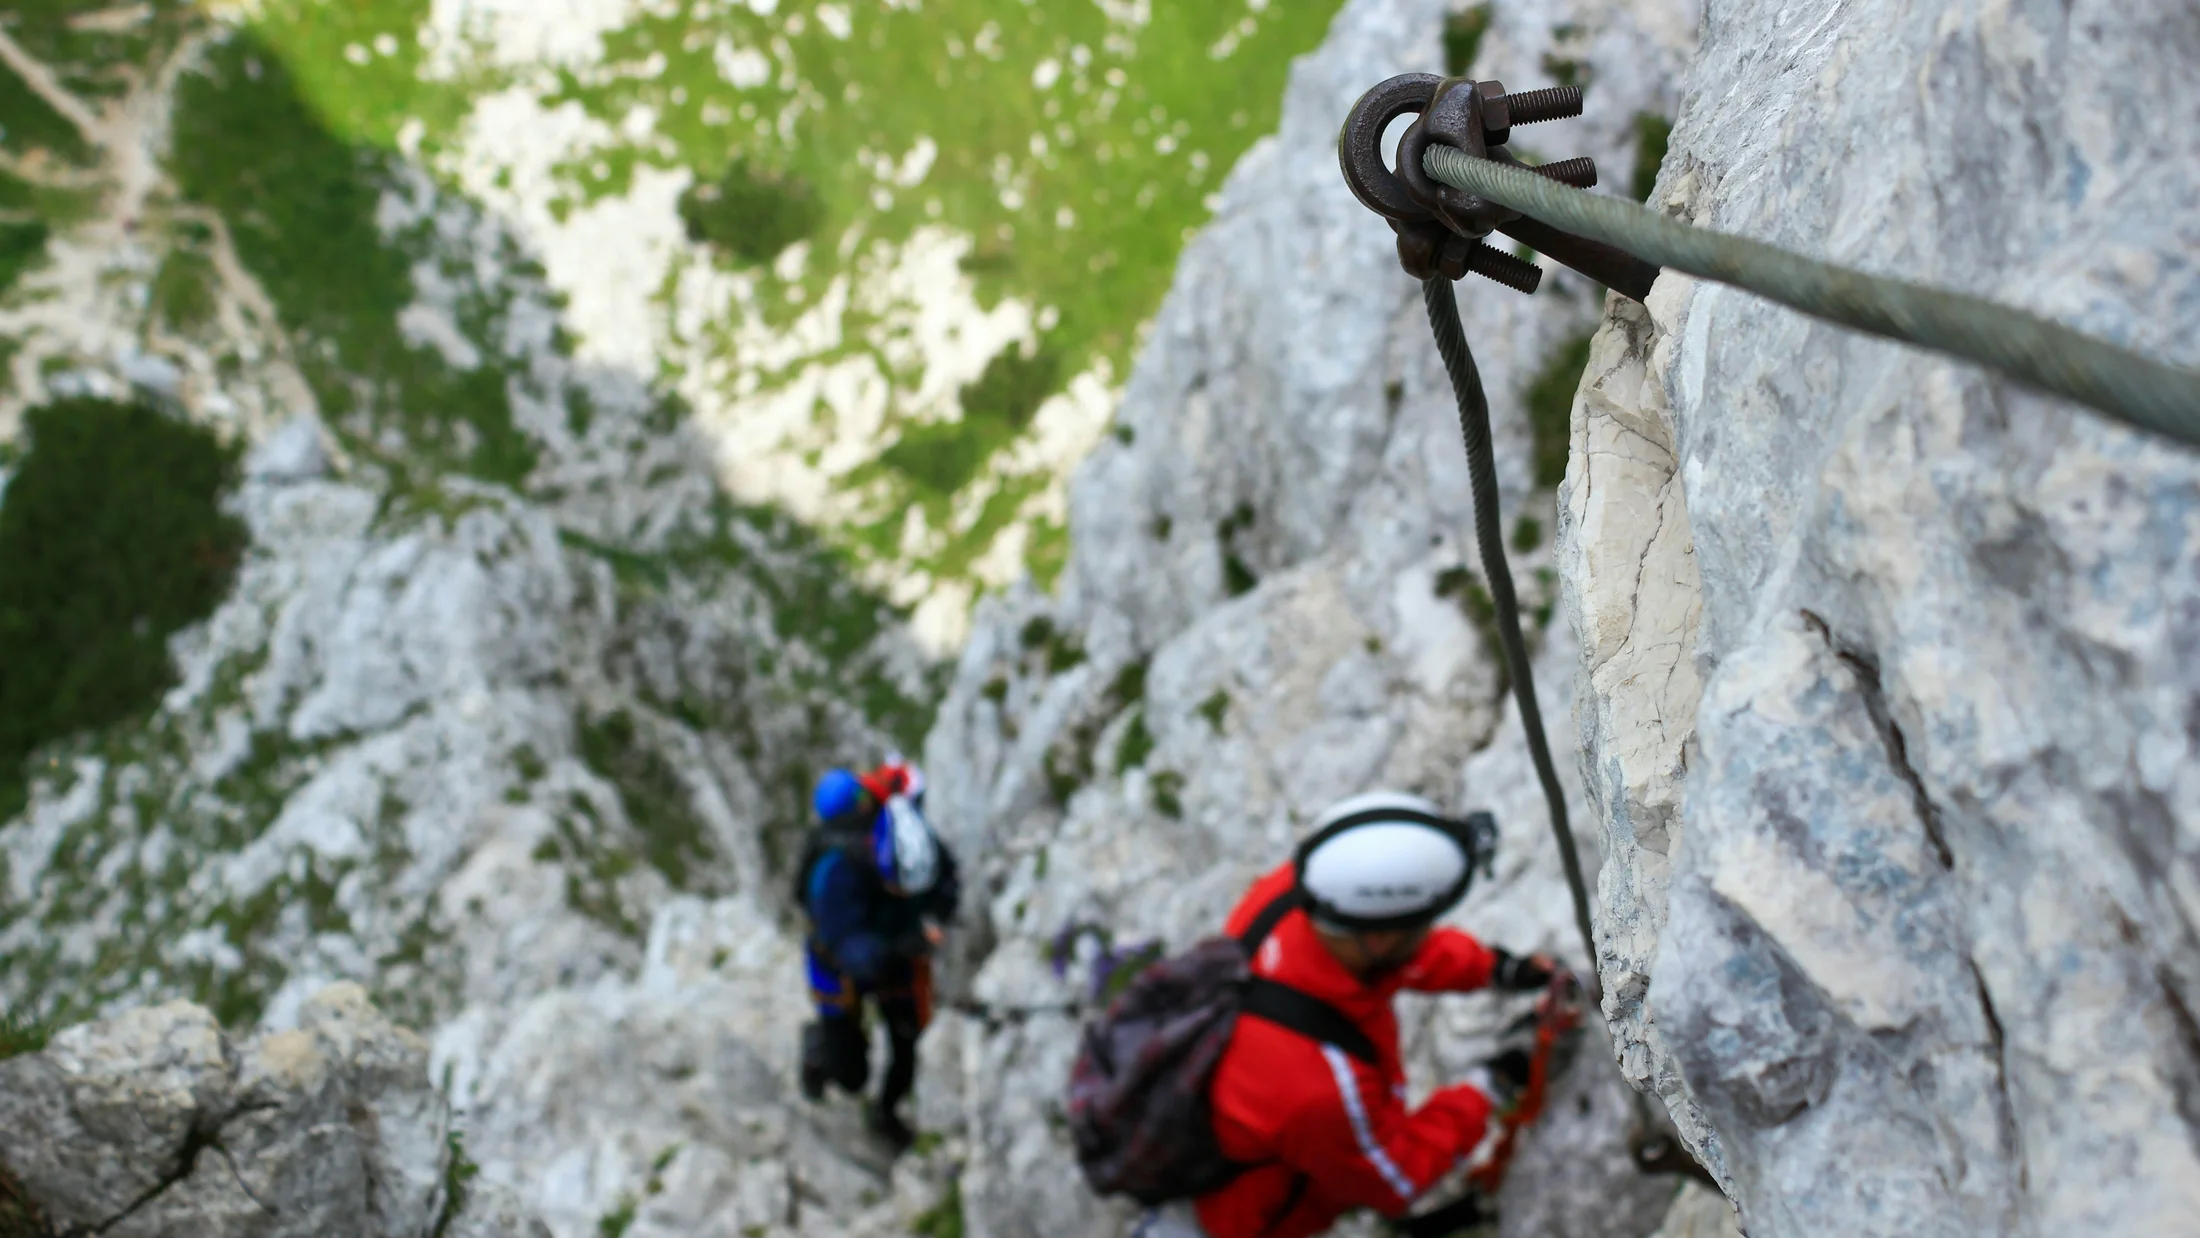
A via ferrata route blends natural rock with fixed protection. The lifeline is a steel cable called the main cable or “linea de vida,” anchored to the wall with metal bolts or rebar every few meters. You progress using metal rungs and steps (grapas/peldaños) drilled into the rock, plus footholds and handholds on the natural surface.
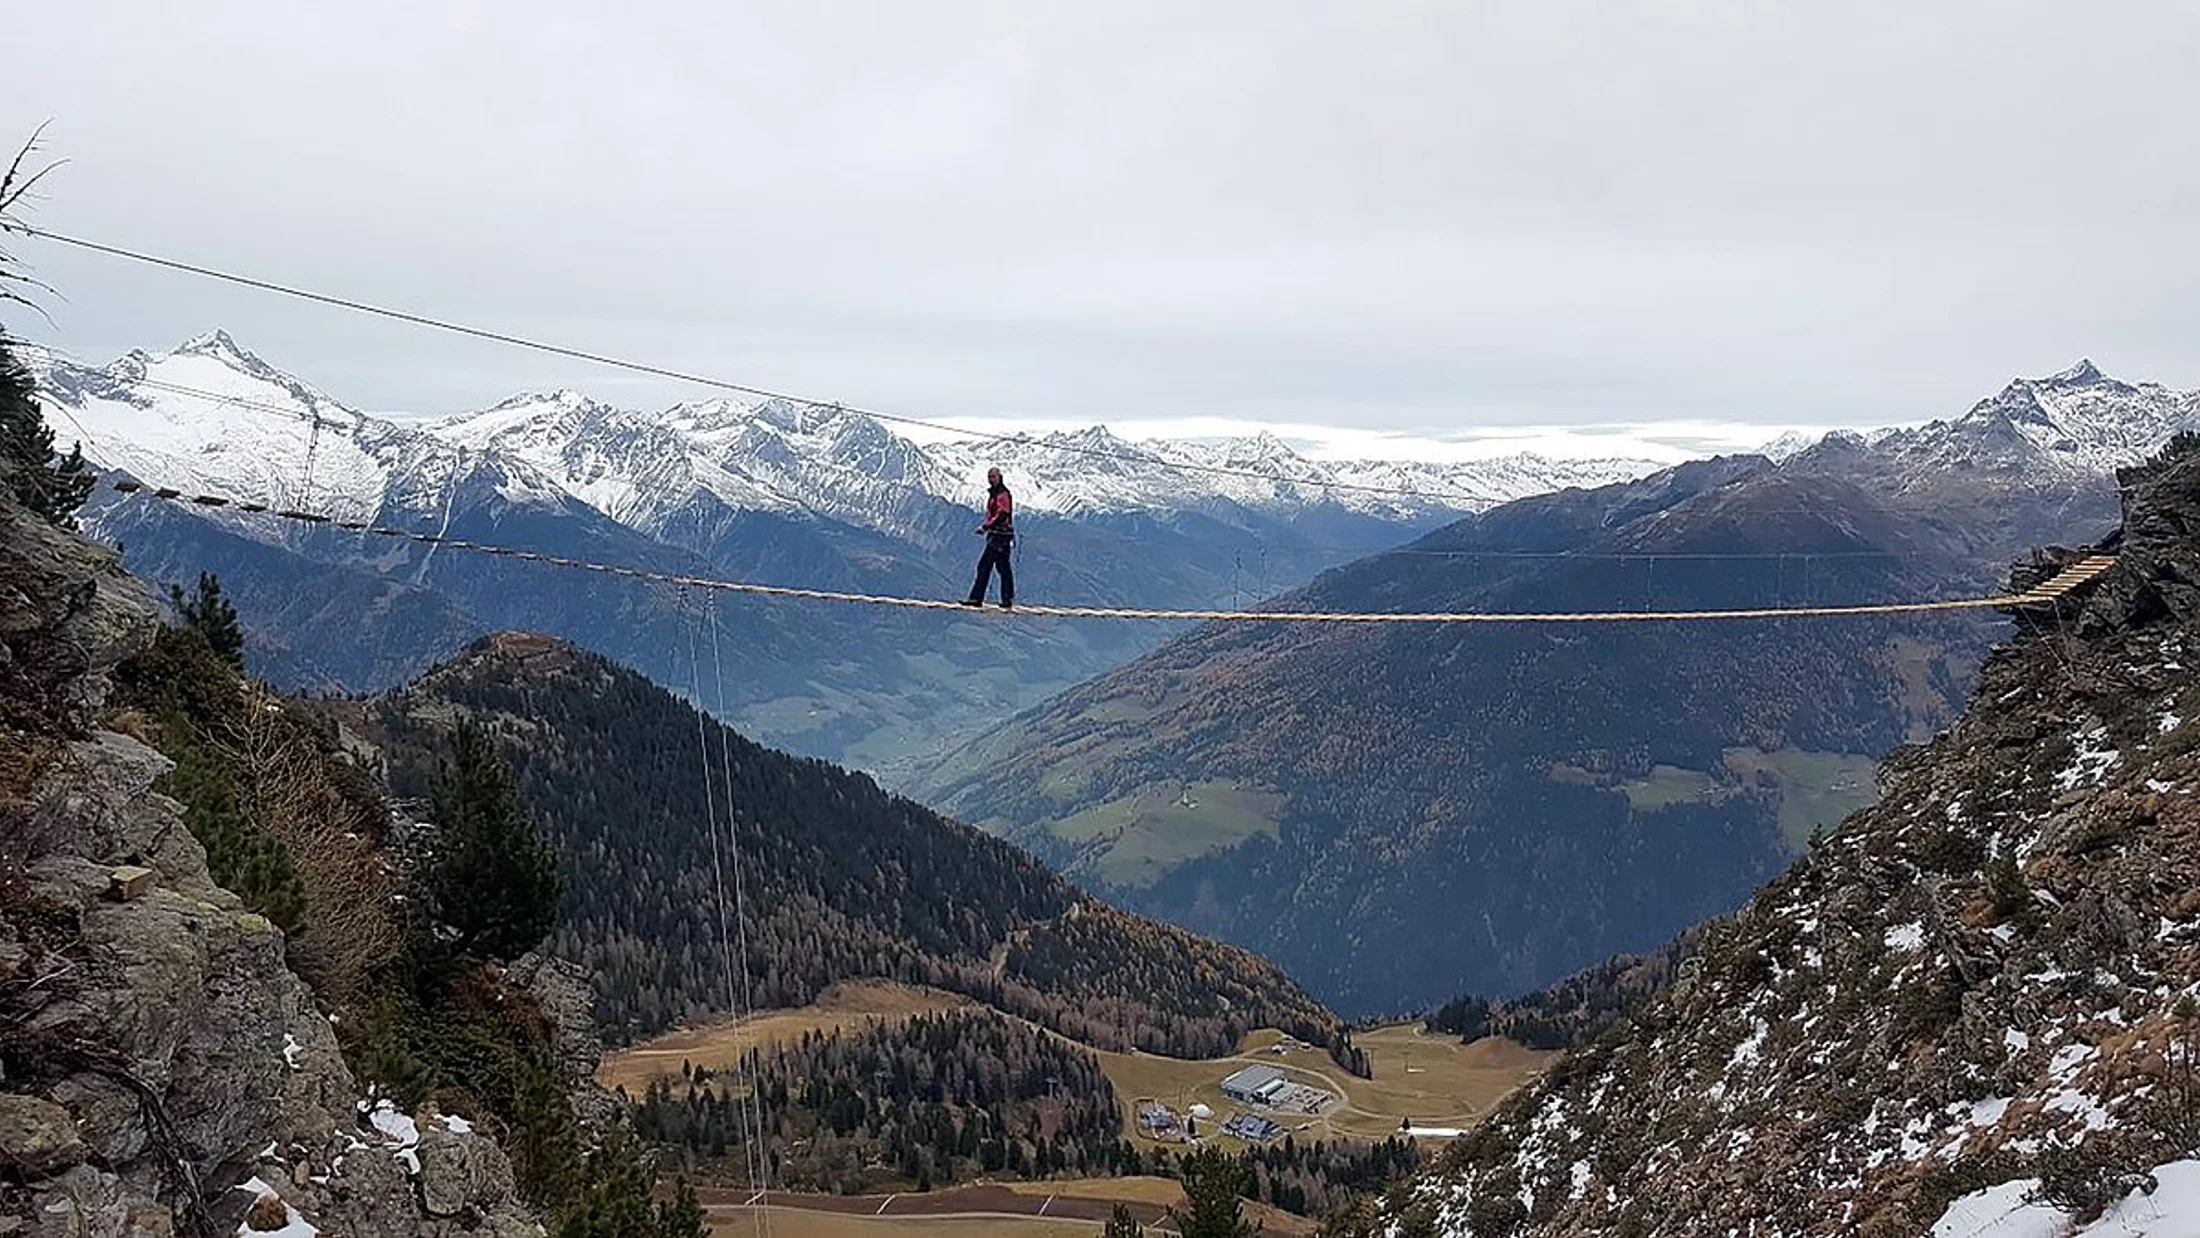
The cable hums faintly in the breeze as you clip and unclip with steady rhythm. Anchors (points where the cable is fixed) create segments; you must pass each anchor safely by transferring your lanyards one at a time. Handrails are extra cables or chains for balance on traverses. Some routes add bridges—simple “Nepalese” style with one cable for feet and two for hands, or more stable plank bridges—and, occasionally, ziplines (tirolesas) where you need a specific pulley.
Your core safety system is the via ferrata set (also called a lanyard with an energy absorber). The energy absorber (disipador) is a device that reduces impact force in a fall by tearing or friction; it’s certified under EN 958:2017/UIAA 128. Two locking carabiners connect you to the cable; modern sets use “K-type” carabiners with automatic locking gates. You wear a sit harness (EN 12277), and in some cases a chest harness to stabilize the torso, linked with a proper connector—not a simple sling.
Routes often include escape options—signed detours that leave the wall back to a path—useful if weather worsens or someone tires early. Together, these elements create a predictable system: you clip in at the start, follow the cable through steps and features, pass anchors methodically, and stay attached to the lifeline until the end.
Difficulty Levels and How to Choose Your First Route
Via ferrata difficulty scales describe exposure, physical demand, and the technical features you will face. The widely used Klettersteig scale runs from K1 (easy) to K6 (extreme). In practice, K1–K2 are beginner-friendly, with frequent rungs, short verticals, and limited exposure. K3 adds steeper walls, occasional overhang starts or longer bridges. K4 is sustained, with athletic moves and airy traverses; K5–K6 are very strenuous and psychological, often with overhangs and spaced holds.
A hawk’s call drifts across the crag as you weigh grade versus comfort with heights. You may also see the Hüsler scale (A–F) in guidebooks: roughly, A–B align with K1–K2, C with K3, D with K4, E–F with K5–K6. Some local topos add symbols for bridges, ziplines, or mandatory pull-ups. Grades reflect the hardest mandatory passage, not the entire route.
Choose with honesty about your background:
- Total beginner or nervous with exposure: pick
K1orK2, short length, easy escape. - Hiker with good fitness but new to ferratas:
K2or a shortK3with a guide or experienced partner. - Climber comfortable on vertical rock:
K3–K4as a first test is reasonable, provided you respect the different fall dynamics.
Other key filters include total time (approach + route + descent), weather window, and whether special gear is required (pulley for ziplines). If you have limited equipment or a small group, favor routes with simple logistics and clear waymarking.
Essential Via Ferrata Equipment
Your protective triangle is helmet, harness, and via ferrata set. A climbing helmet certified to EN 12492/UIAA 106 protects from rockfall and bumps; choose a comfortable, well-ventilated model that fits snugly with the strap closed. A sit harness (EN 12277) should feel secure around waist and legs, with buckles doubled back if manual.
The rock smells faintly of dust and wild thyme as you cinch the waist belt. A certified via ferrata set—lanyards with an energy absorber per EN 958:2017/UIAA 128—is mandatory. Look for auto-locking K-type carabiners with large openings and a clear, readable label showing the standard and manufacturing date. Gloves (fingerless or full) protect hands from frayed cable and improve grip; via ferrata-specific gloves have reinforced palms.
Footwear matters more than you think. Choose stiff-soled approach shoes or light boots with good edging and rubber that grips on rock; avoid soft running shoes that tire calves quickly. Long trousers resist scrapes; sunglasses or safety glasses protect from debris. Optional but useful: a short rest tether (cow’s tail with locking carabiner) to clip at anchor points; never use dynamic lanyards as primary attachment on the cable.
Renting versus buying depends on frequency. Renting is cost-effective for first timers and ensures up-to-date standards if you choose a reputable provider. Buying makes sense if you plan multiple outings and can maintain gear. Always inspect: check harness webbing for cuts, helmet shell for cracks, and the absorber pouch’s seal/tags; retire any gear with unknown history, damage, or past falls. Consult the manufacturer’s instructions and lifespan guidance.
Critical compliance
Only use via ferrata sets certified to EN 958:2017 or UIAA 128. Older pre-2017 sets may not manage fall forces adequately for lighter or heavier users.
Step-by-step Progress for Your First Wall
Preparation starts days before. Build baseline fitness with hiking that includes elevation gain, and practice balance on uneven ground. Choose a route with K1–K2 rating, short length, clear escape, and a stable weather forecast; read a topo and recent reports to confirm status, access, and any permits.
Sun breaks over the ridge as you shoulder a light pack at the trailhead. At the base, gear up in order: harness on and double-backed, helmet fitted and closed, via ferrata set attached to the belay loop per the manufacturer’s instructions. Do a buddy check: each carabiner locks properly, lanyards untwisted, absorber label visible and in date. Warm up shoulders and hips; drink water.
On the wall, use your legs as engines. Keep arms straight when possible to conserve energy, and maintain three points of contact (two feet and a hand, or vice versa). Place feet on rungs or small rock edges, driving from your legs rather than hauling with your biceps. Keep your center of gravity close to the wall to reduce pump.
Managing the cable is the heart of safe progress. Clip both carabiners to the cable as you move, and when you reach an anchor, transfer them one at a time—never unclip both simultaneously. Keep the lanyards above your harness when you can to reduce potential fall distance, and avoid sitting in the lanyards except at designated rest points using a short rest tether. On bridges, clip to the dedicated cables and move intentionally; on ziplines, use an approved pulley and back it up if the topo requires, then reclip to the main cable as soon as you land.
Pace yourself. Rest frequently by standing tall on your feet, shaking out one arm at a time, and breathing steadily. Eat small snacks to keep energy steady. If you feel overwhelmed by exposure, focus your gaze on the next step and the rock in front of you, then expand your view once you feel stable again.
Descending safely matters as much as the climb. Follow the marked path, watch for loose stones, and keep helmets on until clear of rockfall zones. In wet conditions, down-scrambling can be slick; hiking poles in the pack help on the return trail.
To progress, collect easy wins. Repeat K1–K2 routes to refine clipping and footwork, then try a short K3 with an experienced partner or certified guide. Consider an introduction course with a federation or local provider to practice anchor transitions, energy absorber principles, and emergency scenarios in a controlled setting.
Safety, Risk Management, and Common Mistakes
Good habits compound into safety. Do pre-climb checks: harness buckles secured, helmet strap fastened, via ferrata set correctly attached to the belay loop, and both carabiners locking and oriented for easy one-by-one transfers. Space out 3–5 meters on easy ground and a full segment (between anchors) on steep sections to reduce the risk of a falling person colliding with someone below.
A cool wind brushes the cable as you wait at an anchor and let a team pass. Learn to say “passing on your left/right” calmly, and only overtake at secure stances. Treat falls as unacceptable goals: via ferrata sets manage impact but do not make falls harmless. If a slip happens, keep feet forward to absorb contact, protect your head, and self-assess carefully before continuing.
Common mistakes and how to avoid them:
- Unclipping both carabiners at once at an anchor: always transfer one at a time.
- Clipping both carabiners to the same small ring or rung: clip to the moving cable or designated anchor points; avoid single weak points.
- Using a static sling as a lanyard: only certified absorbers per
EN 958:2017are acceptable. - Relying on arms, ignoring feet: keep arms straight, drive from legs.
- Rushing in groups: maintain spacing and communicate clearly.
- Underestimating exposure: start with lower
Klevels until your head adapts.
Emergencies: in Spain dial 112. Provide clear location (route name, sector, nearest town), symptoms, and time. If you have coverage, the AlertCops app can share coordinates with authorities. Consider carrying a whistle and an emergency blanket.
When to hire a guide: on your first via ferrata, when supervising minors, in complex K3+ terrain, or where special equipment (pulleys) and tricky logistics exist. Certified guides teach efficient movement, risk awareness, and local ethics that respect landowners and wildlife.
Practical Checklists and Beginner-friendly Routes in Spain
Pre-departure checklist
- Check the weather forecast for the entire window (approach, climb, descent); cancel a via ferrata if storms or high winds threaten.
- Confirm your physical condition and any health considerations; do not start if dizzy, dehydrated, or ill.
- Study the route topo: grade (
K1–K2for new users), length, escape options, features (bridges, zipline), and descent. - Verify access notes, parking, and permits if any; respect closures for nesting or maintenance.
- If using a provider, confirm booking, meeting point, and whether via ferrata equipment is included.
- Inspect gear: helmet shell, harness webbing and buckles, via ferrata set label and absorber pouch integrity; retire anything suspect.
- Charge your phone fully; pre-load offline maps of the trailhead and descent.
A faint pine scent rises from the pack as you lay items out for a final check.
Pack and on-route essentials
- Water: 1.5–2 liters per person depending on temperature and route length.
- Food: compact, salty and sweet snacks plus a simple sandwich or energy bar.
- Layering: light windproof/ waterproof shell and a warm layer if the approach is high or shaded.
- Gloves: via ferrata gloves; carry a spare light pair if you expect wet cables.
- Footwear: approach shoes or light boots with grippy rubber; bring spare socks in wet seasons.
- Safety add-ons: headlamp, whistle, small first-aid kit, sunscreen, lip balm, and a compact emergency blanket.
- Extras: short rest tether with locking carabiner, small tape roll for knuckles, and a trash bag to carry out waste.
- Phone with full battery and ID; keep phone in a secure pocket to avoid drops.
Pack heavy items close to your back, helmet accessible, and the via ferrata set clipped to the harness belay loop only when you start.
El Chorro, Málaga: A classic place to begin
El Chorro sits in the Guadalhorce valley near Álora, about 1 hour by road from Málaga city, with train service to El Chorro–Caminito del Rey station. The area is famous for dramatic gorges and sunlit limestone walls, and it hosts accessible lines that many locals use as a first via ferrata experience. Expect straightforward rungs, great views over reservoirs, and well-trodden approaches.
Warm rock and the scent of rosemary often ride the afternoon breeze here. For beginners, choose an itinerary graded around K2 (some sectors in the El Chorro/Ardales area match this profile) with short exposed sections and obvious anchors. Plan 2–3 hours total including approach and descent, and avoid the midday heat in summer; autumn through spring offers the most comfortable conditions in Andalucía.
Logistics are simple. You can rent via ferrata equipment and book guides in nearby towns such as Álora, Ardales, and Valle de Abdalajís; ask providers about current conditions and recommended start times. Reach the trailhead by local road from Álora or by train plus a short taxi ride; parking can be limited on peak weekends. Among vías ferratas España, El Chorro stands out for scenery and a supportive local community used to welcoming first-timers—arrive early, move courteously, and let faster parties pass at anchors.
Local tip
Many providers serving Caminito del Rey also rent certified helmets, harnesses, and via ferrata sets; confirm they meet EN 958:2017 and ask for a brief equipment check before you go.
La Hermida, Cantabria: Accessible and panoramic
The Vía Ferrata de La Hermida rises above the Deva River in the Desfiladero de la Hermida, between Unquera and Potes along the N-621. Several itineraries exist, with beginner-suitable options commonly around K2–K3, plus airy bridges and at least one optional zipline depending on the sector. Expect 2–3 hours round trip for short options, with longer variants for the ambitious.
Morning mist lingers in the gorge as choughs circle high above the Deva. Why choose La Hermida? Access is direct from the roadside, features are well-equipped, and the scenery is classic Picos de Europa foothills. Services are nearby: cafés, hot springs in La Hermida village, and guiding companies based in Potes and surrounding valleys. For first visits, a guide helps you interpret levels—those “niveles vía ferrata” feel different in deep gorges—and offers tailored consejos vía ferrata such as pacing on sustained traverses.
Go in spring to autumn for stable weather, and avoid heavy rain that makes rock slick. Bring gloves suitable for damp cables and a light layer for shade in the canyon. Renting equipment is straightforward in the Liébana area; confirm the need for a pulley if your chosen line includes a zipline and ask about current restrictions or seasonal closures. For many newcomers comparing vías ferratas España, La Hermida combines access, variety, and a strong local culture that respects both the river and the limestone cliffs.
Resources in Spain
- National: FEDME (mountain and climbing federation) courses and local clubs.
- Andalusia: regional mountaineering federation courses and providers around Málaga.
- Cantabria: Federación Cántabra de Montaña for training and area updates.
- Technical references: UIAA Safety Standards, Petzl Technical Notices for via ferrata sets.
Conclusion and Next Steps
Via ferrata blends the freedom of hiking with the security of engineered protection. You learned how the system works—cable, rungs, anchors, and handrails—what the grades mean (K1–K6), and which via ferrata equipment matters most: a certified set with energy absorber, a well-fitted harness, and a helmet. You also saw how to prepare, move efficiently, avoid common mistakes, and choose welcoming routes in Spain.
A last glow of sun warms the wall as you step onto the descent path, calm and alert. For progression, start with short K1–K2 outings, rent gear at first, then invest once you know your preferences. Consider a basic course with a federation or certified guide to practice anchor transitions, emergency communication, and descent navigation. Keep building judgment: check weather, inspect equipment, and choose routes that match your head for heights and your fitness.
If you want local insight and reliable logistics, explore carefully selected guides and rural stays on Picuco to plan your first outing in Málaga or Cantabria. Take your time, respect the land and communities who care for these routes, and enjoy the quiet thrill of moving safely across open air.