Introduction
Why starting in the right place sets you up for success
If you searched for “climbing for beginners Spain,” you’re in the right place to turn curiosity into confident first steps. Spain’s climbing scene has grown fast in the past decade, from bustling indoor gyms to friendly outdoor crags, and beginners benefit from clear guidance on areas, safety, and how to progress. You’ll find practical picks that balance easy access, a good spread of grades, training options, and nearby services.
Chalk dust floating in a sunbeam as you tie your first knot captures the mix of focus and thrill that draws people in.
We used down-to-earth criteria that matter on your first trips: access by public transport or short drives, short walk-ins, many routes in 3–6a (French grades), solid bolting, and nearby guides or courses. You’ll also see when to go, what rock to expect, and how to keep costs in check. Each destination includes who it suits, where to warm up, and simple ways to combine climbing with local culture. Read on, pick a spot that matches your level and season, and build good habits from day one.
What we looked for in beginner-friendly areas
We selected eight starter areas using concrete, beginner-focused criteria:
- Access and logistics: Under 90 minutes from a major city when possible, short approaches (often under 20–30 minutes), and parking or bus options.
- Grades for learning: A clear concentration of routes in
3–6afor top-rope and first leads; “escuela” sectors (teaching areas) prioritized. - Safety on the wall: Modern bolts, reliable anchors, and straightforward descents; we avoid loose, complex terrain for first visits.
- Training ecosystem: Local rock climbing courses in Spain led by certified guides, plus nearby climbing gyms for rainy days.
- Conditions: Favorable seasons, shade/sun options, and microclimates that reduce weather cancellations.
- Services: Accommodation, food, water points, and, where relevant, reserved or regulated parking with clear rules.
To use this list, match your aims (top-rope practice, first leads, multi-pitch taster) to the notes in each destination, check the best season, and plan with a fall-back gym or guide if conditions change.
Picuco te puede ayudar
Does something here catch your eye?
Tell us.
Write to us on WhatsApp or email: we answer questions, find the best options and help you sort out the booking.
Why People Start Climbing, and What to Expect Early On
People start climbing to move better, be outdoors, meet others, and feel progress in small, satisfying steps. You can train in a gym near home, then explore beginner climbing spots in Spain that keep the learning curve manageable. If you want fitness, expect steady gains in grip strength and balance; if you’re in it for nature, weekend trips to crags turn into simple rituals with friends. Your first sessions should focus on safety, footwork, and smooth breathing, not grades.
The forearms buzz and the rock feels cool and textured as you stand on a small edge for the first time.
Set realistic timelines: many beginners belay safely after 2–4 supervised sessions, top-rope 4–5 within a few weeks, and reach 5+/6a after consistent practice in several months, though progress varies widely. Outdoors, routes feel harder than in the gym because holds are less obvious, so plan a cushion: if you climb 6a indoors, start on 4–5 outside. Risks exist but are manageable with checks, helmets, clear commands, and conservative choices. Doubts are normal: Am I strong enough? Do I need a partner? Where do I begin? Start with one modality in your routine, keep a simple training log, and lean on experienced partners or certified guides for your first outdoor days.
Beginner-friendly Styles: Gym, Boulder, and Roped Routes
Three common paths help you start smart: indoor gym sessions, bouldering (short climbs without ropes), and sport climbing with a rope on bolted routes. Each teaches different skills and suits different goals.
Sunlight on colored holds and the quiet click of a carabiner keep your focus anchored in the present.
| Modality | What you learn fast | Gear needed | Typical costs | Best for | Watch-outs |
|---|---|---|---|---|---|
| Indoor gym (rope/top-rope) | Belaying, knot tying, footwork | Harness, belay device, shoes; rope usually provided | Day pass 8–15 €; rental 5–10 € | Safety basics, routine training | Learn partner checks properly; follow staff policies |
| Bouldering (indoor/outdoor) | Movement, body tension, problem-solving | Shoes; chalk; outdoor: crash pad | Gym pass 8–12 €; pad rental 10–20 € | Technique and confidence | Outdoor landings can be uneven; spot each other |
| Sport climbing outdoors | Route reading, clipping, stance work | Shoes, harness, belay, helmet, rope 60–70 m, quickdraws |
Course/guide 60–120 € p.p./day; fuel/parking varies | Transition to real rock | Choose easy grades; wear a helmet; confirm anchors |
Choose the gym if you want structure and quick feedback. Pick bouldering to sharpen movement with minimal kit and no knots to learn at first. Opt for roped sport climbing if your dream is real rock and weekend trips; start on top-rope or hire a guide for first leads. A balanced path is to build basic skills indoors, then book a beginner day outside to connect technique with outdoor systems.
Essential Gear and a Realistic Starter Budget
You can begin with rented equipment while you learn what you like, then buy the essentials that fit your feet and hands. If your plan includes outdoor climbing for beginners, prioritize a good helmet and a trustworthy belay device.
New rubber grips the rock with a faint squeak as your foot settles on a small edge.
Core items and typical price ranges (check updated retail prices before you buy):
- Climbing shoes: 50–120 € entry-level; fit should be snug, not painful.
- Harness: 40–80 €; look for adjustable leg loops and a clear tie-in point.
- Belay device + carabiner: 25–50 € total; assisted-braking options add control but require proper training.
- Helmet: 40–80 €; always wear it outdoors for rockfall and when belaying.
- Chalk bag + chalk: 15–25 € total; liquid chalk helps in humid conditions.
- Rope
60–70 m(if leading or building independence): 120–200 €; verify diameter matches your belay device. - Quickdraws (10–12): 100–180 €; optional early on if top-roping pre-equipped routes or with a guide.
Ways to save without cutting safety:
- Rent shoes/harness at gyms for first sessions (5–10 €) and try several models before buying.
- Split a rope and quickdraws with a committed partner once you both are leading.
- Avoid unknown used PPE (harnesses, ropes, helmets); only accept from trusted sources with a clear history.
- Buy durable basics first, then upgrade shoes later as technique improves.
A starter budget ranges from 100–200 € if renting most items indoors, up to 300–500 € when buying shoes, harness, belay, and helmet; adding rope and quickdraws brings you closer to 450–800 €.
Safety Basics and Fundamental Techniques
Climbing safety is a skill you practice every time, not a one-time checklist. Indoors and outdoors, build habits that reduce risk and free your mind to learn movement and enjoy the view.
The rope hums softly through the device as you keep a steady brake hand.
Essential practices:
- Partner checks before every climb: harness double-backed, knot (figure-eight follow-through) dressed and tightened, belay device threaded correctly with a locked carabiner, rope end tied with a stopper knot if short.
- Clear commands: “On belay?”, “Belay on”, “Climbing”, “Climb on”, and “Take/Slack” avoid confusion; confirm shared language if partners differ.
- Belaying basics: keep a firm brake hand at all times; practice the “lock-slide-lock” motion with an instructor; stand close to the wall for better control.
- Top-rope anchors: use two independent points; never lower off a single bolt; ask a guide or experienced partner to inspect anchors until you’re confident.
- Knots: learn the figure-eight follow-through and stopper knot; for rigging, learn the clove hitch under supervision.
- Route info: read local topos or guidebooks (“reseñas”) to confirm route length, anchor type, and required quickdraws; if a route is 35 m, a
70 mrope may be mandatory.
For faster, safer progress, consider a one- or two-day initiation course with a certified guide; you’ll practice falls, clipping, cleaning anchors, and safe lowering in real conditions. Check forecasts with AEMET (Spain’s meteorological service) and obey posted rules in protected areas.
Choosing Your First Outdoor Crag
Your first outdoor day should feel clear and calm: easy-to-find parking, a short approach, and routes where you can practice breathing and footwork without pressure. Pick conservative grades and avoid complex descents or loose ledges.
Pine scent on a shaded path and the crunch of gravel underfoot set a steady rhythm before the wall appears.
Key factors:
- Distance and access: under two hours from home reduces logistics stress; short, well-marked approaches help.
- Grades and density: look for many lines in
3–5and a few in5+–6ato grow into. - Rock type and style: granite slabs teach balance; limestone often has positive holds; conglomerate needs precise foot placements.
- Comfort at the base: flat belay spots, shade options, and minimal exposure or loose rock.
- Parking, permits, and rules: some areas have regulated parking or seasonal closures; check the park or municipal website.
- Services: nearby towns with accommodation, water, and food; local schools or guides for top-rope setups and first leads.
- Weather and best season: spring and autumn are reliable in many regions; in summer, chase shade or higher elevations; in winter, pick sunny south-facing sectors.
Once you shortlist a crag, plan a Plan B (nearby shaded sector or indoor gym) and avoid weekends at the most popular walls until you know the flow.
Eight Easy Places to Begin Climbing in Spain
1.La Pedriza (madrid): close-to-capital granite and classic “escuela” sectors
La Pedriza sits about 50–60 km north of Madrid, near Manzanares el Real, with bus 724 from Plaza de Castilla and road access via the M-607/M-608. Granite slabs dominate, so you’ll practice friction and balance rather than pulling on big holds, which makes it a great teacher of precise footwork. Best seasons are autumn, winter on sunny days, and spring; summer heat and polished slabs can be uncomfortable.
One cool morning breeze across the granite and the faint rubber squeak under your toe signal the beauty of slab climbing.
Beginner-friendly zones include sectors near Canto Cochino and “Cancho de los Brezos” with short routes in IV–V and some V+. Expect short walk-ins (10–25 minutes) and flat bases in popular spots. Parking inside the park is regulated; on peak days you may need an advance reservation or to arrive early—check Sierra de Guadarrama National Park notices. Typical costs: parking often free but regulated; a group course with a certified guide runs 60–100 € p.p./day; fuel from Madrid 10–20 €. Bring a helmet, sticky-soled approach shoes, and consider early or late climbing to avoid midday sun. Combine with indoor sessions in Madrid during hot spells, then return to Pedriza to test your balance outdoors.
2.Chulilla (valencia): mellow village vibes and friendly conglomerate/limestone
Chulilla lies about 60 km northwest of Valencia via the CV-35 and local roads, with classic river gorge scenery and a welcoming climbing culture. The rock mixes limestone and rounded pebbles (conglomerate), which teaches careful foot placements and relaxed grip. The best seasons are autumn through spring; summers get hot in exposed sectors.
Warm light on the cliff bands and the soft echo from the gorge make even easy climbs feel dramatic and satisfying.
For first visits, look for “escuela” sectors and shorter walls such as Pared Blanca or sectors near village approaches with many lines in IV–6a. Bases are often friendly, and topos help you pick routes with good bolts and anchors; avoid the longest stamina routes until later. Expect free parking near marked access points and modest daily costs: fuel 10–20 € from Valencia, budget meals in town, and guide-led initiation days around 60–100 € p.p. Chulilla has local schools and, in season, visiting certified guides—confirm availability and pricing in advance. Stay in village guesthouses or rural apartments and enjoy a rest day on riverside walks or the castle loop.
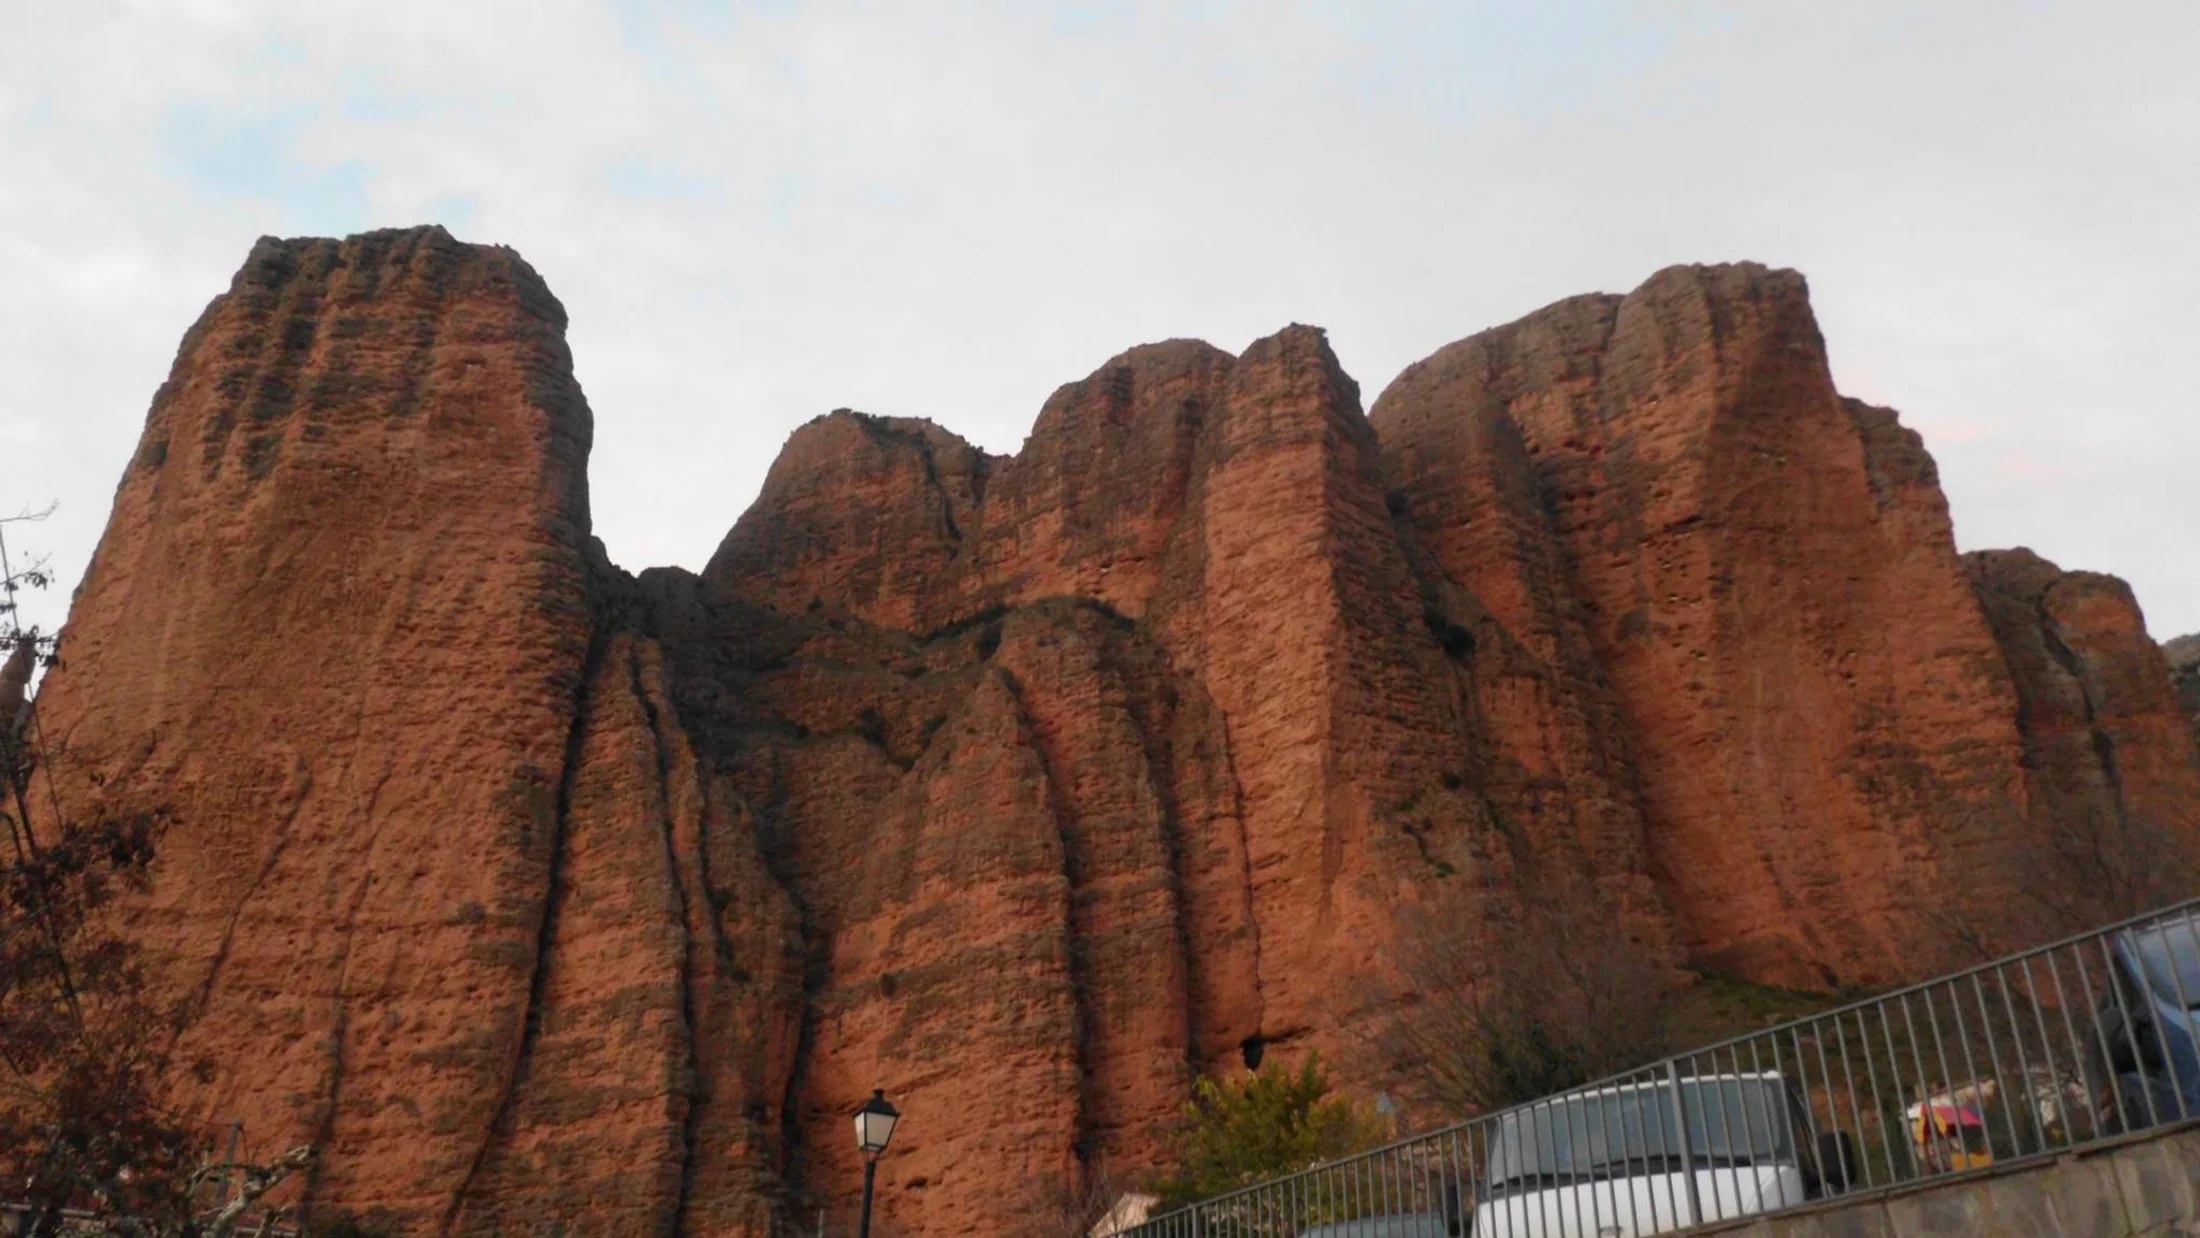
3.Montserrat (catalonia): iconic spires with beginner slabs and short multipitch tasters
About 50 km northwest of Barcelona via the A-2/B-231 and BP-1103, Montserrat’s conglomerate towers form one of Spain’s most recognizable skylines. While many routes are multi-pitch, beginners will find slabby single-pitch sectors and short, well-bolted lines to learn on. Spring and autumn are prime; winter offers sunny windows, and summer shade exists but requires careful sector choice.
A bell toll drifts from the monastery while your shoes whisper across warm, pebbled stone.
Try lower-angle sectors near Can Jorba or other well-known beginner walls with IV–V routes and straightforward anchors; topos help pinpoint suitable lines. If you’re curious about multi-pitch, hire a certified guide for a two-pitch taster to learn stance management and communication. Parking near the monastery often costs 6–10 € per day (confirm on site), while trailhead pull-offs vary. Guided days typically run 70–120 € p.p. Montserrat pairs neatly with a cultural visit to the monastery and viewpoints. Be conservative with route finding, as the maze of towers can be confusing; carry a helmet, ample water, and consider a 60–70 m rope depending on chosen sectors.
4.Siurana (tarragona): compact limestone and a storied climbing atmosphere
Siurana sits above the village of Cornudella de Montsant, about 40 km from Reus and ~120 km from Barcelona via the AP-7 and local roads. It’s famous for sustained limestone, yet there are friendly “escuela” sectors for new climbers. Autumn and spring shine here; crisp mornings and cool shade make footwork-focused climbing rewarding.
A hawk circles silently over terraced vineyards while your fingertips trace the ripples of cool limestone.
Look for beginner sectors like Can Marges and some easier walls at Siuranella to find clusters of 4–6a lines. Many bases are comfortable, though some approaches climb steadily; check route lengths to match your rope (60–70 m). Parking is limited near the village—use signed areas and respect local rules. Expect costs such as fuel from Barcelona (20–35 €), simple meals in Cornudella, and course days with certified guides in the 70–120 € p.p. range. Stay at campgrounds or rural lodgings in Cornudella and consider combining with nearby Arbolí or La Mussara, which add more beginner-friendly choices and shade options.
5.Mallorca (cova del Diable and accessible school crags): island options for first routes
Mallorca is reachable by short flights (about 1 h 20 min from Madrid/Barcelona) or ferry; a rental car (25–45 € per day) unlocks coastal crags and inland hills. The island has deep-water solo (DWS) areas like Cova del Diable, but beginners should start on bolted school sectors and sample DWS only in calm seas and warm water with local advice. Spring and autumn are excellent for sport climbing; summer favors morning shade or the DWS season when the sea is warm.
Sea breeze salt on your lips and pale cliffs glowing at sunrise make early starts feel easy.
Beginner-friendly sectors include beach-access climbs at Cala Magraner with 4–6a routes and inland walls like parts of Sa Gubia with shorter, well-bolted lines. Expect free or low-cost coastal parking—arrive early—and mix climbing with swims and short hikes. Typical costs include fuel, car hire, and flexible accommodation from campgrounds to rural hotels; guided initiation days often run 70–120 € p.p. On DWS, wear good approach shoes, bring a towel and warm layer, scout exits, and keep falls controlled—tide and swell matter. Respect seasonal restrictions and protected coves; check municipal and park notices on site.
6.Rodellar (huesca): early progression in a dramatic canyon setting
Rodellar, about 1 h 15 min from Huesca in the Sierra de Guara, is known for overhangs, yet the area and nearby sectors offer short, friendly routes for learning. Spring and autumn lead the season; summer is hot but the Mascún stream provides welcome swims, and shade exists in selective walls. The limestone and conglomerate features teach you to relax your grip and use your feet even on steeper ground.
Water murmurs in the canyon while swifts arc across the shade line above the arching walls.
For first visits, seek out lower-angle or shorter sectors around the village and Cheto with clusters of routes in IV–6a. Ask locally or hire a certified guide to pinpoint top-rope set-ups and learn safe cleaning of anchors. Camping and village accommodations are well set up for climbers; expect camping 10–20 € p.p., simple meals, and guide days around 60–100 € p.p. Parking is usually in designated village areas; respect local signage and avoid blocking narrow lanes. Consider a rest day canyon walk or a visit to nearby Alquézar. Bring a helmet, plenty of water, and a 70 m rope if aiming for taller lines.
7.Picos de Europa (accessible valley sectors): mountain feel with manageable approaches
The Picos span Cantabria, Asturias, and León; for beginners, look to accessible valley sectors around Arenas de Cabrales, Valdeón, or approaches from the Hermida gorge. You get mountain air and big views without committing to complex alpine routes. Best seasons run from late spring to early autumn; winter is for experienced teams and sunny low crags only.
Cowbells drift from the meadows while cool air pours down the valley at dusk.
Search for “escuela” walls with IV–6a lines and flat bases near villages; local topos or guidebooks help pinpoint child-friendly options. If keen on a cable-car experience, Fuente Dé offers quick altitude but save high-station walls for later; weather changes fast at elevation. Costs vary: valley parking is often free or low-cost; refuges from ~15–30 € p.p.; cable car fares fluctuate—confirm locally. Given the mountain setting, consider a guide for your first day to learn safe route choice and weather strategy. On rest days, walk easy sections of the Cares trail or explore cheese-making villages that define the region’s pastoral culture.
8.Patones and nearby Madrid crags: easy access and a reliable learning ground
Patones de Abajo sits roughly 60 km northeast of Madrid via the A-1 and local roads, with short limestone sectors that have long served as a school for new climbers. Winter sun, plus spring and autumn, offer the most comfortable conditions; avoid summer afternoons unless you find shade. The rock is crisp limestone with many vertical faces that reward precise feet and calm breathing.
Warm limestone edges under your fingertips and quiet fields below make short winter days surprisingly generous.
Look for beginner sectors with dense bolts and many IV–6a routes; bases are generally manageable, though some ledges require care. Parking fills quickly on weekends—arrive early, car-share, and respect signed closures. Costs stay modest: fuel from Madrid 10–20 €, parking typically free in signed areas, and group initiation courses around 60–100 € p.p. Combine outdoor days with weekday sessions in Madrid’s gyms to rehearse knots and belaying. Local bars offer easy post-climb meals; greet residents and keep noise low in narrow streets.
Interactive Map of the Eight Locations
To make trip planning simple, use the interactive map embedded with this article to preview each crag and decide where to go next. You can filter by modality (indoor nearby, bouldering, single-pitch), best season, and driving time from Madrid, Barcelona, or Valencia. Each pin opens a panel with parking notes, approach times, sector suggestions, and nearby accommodations.
A soft gradient of green valleys and ochre cliffs on the map mirrors the variety you’ll find on the ground.
How to get the most from it:
- Select your base city, then filter by “beginner routes
3–6a” to narrow choices. - Toggle shade/sun icons to match season and time of day.
- Save two alternatives within 30–45 minutes in case of wind, crowds, or weather.
You’ll also see markers for water points, bus stops (e.g., Madrid’s bus 724 to La Pedriza), and notes on regulated parking or permits. Open the map before you travel, download the area offline on your phone, and share a location pin with your partner so you can regroup if separated.
Should You Start in a Gym, Book a Course, or Go Straight Outside?
If you value structure and low stress, a gym start is efficient: staff oversight, clear grading, and controlled conditions accelerate the basics. You’ll learn the figure-eight knot, safe belaying, and body position, then transfer those habits to rock. If your priority is real rock and weekends away, a beginner course outdoors collapses the learning curve; you get anchor skills, clipping practice, and route reading taught in context.
Cool air on your face at the base of the wall focuses attention as you run through the final partner check.
Consider these decision points:
- Safety: if neither of you is experienced outdoors, invest in a one- or two-day guided start; it’s cheaper than replacing a rope or recovering from a mistake.
- Budget: gym passes (8–15 €) plus rentals (5–10 €) keep costs predictable; courses (60–120 € p.p./day) fast-track outdoor competence.
- Time: limited weekly hours favor bouldering for fast skill reps; if you have free weekends, schedule one guided outdoor day per month.
- Goals: aiming for multi-pitch? Start in the gym, then book a short multi-pitch taster outside; for bouldering trips, alternate gym bouldering with occasional outdoor pads and spotting practice.
As a rule of thumb, combine 4–8 gym sessions with one guided outdoor day to lock in safe habits, then expand on your own in gentle sectors.
Pre-trip Checklist for Your First Outing
Use this short, practical checklist to reduce stress and make good decisions at the crag. Print it or copy it into your phone notes and tick items as you go.
Dawn coolness on the approach and the rustle of a topo in your pocket make everything feel purposeful and prepared.
- Personal and partner:
- Emergency number saved:
112in Spain - ID, health card, and cash for parking/food
- Contact shared with a friend including crag name and return time
- Emergency number saved:
- Gear:
- Shoes, harness, belay device + locking carabiner, helmet, chalk
- Rope
60–70 m(if needed), 10–12 quickdraws (if leading), slings and carabiners for anchors - Tape, small first-aid kit, headlamp, knife/cord for emergencies
- Route info:
- Topo/guidebook with route lengths; confirm rope is long enough
- Note descent/lower-off details; practice commands
- Area rules and logistics:
- Parking/permit requirements (e.g., regulated access at La Pedriza)
- Seasonal closures or nesting restrictions posted on site
- Water, food, layer for wind, sun protection
- Weather plan:
- AEMET forecast checked the night before and morning of
- Plan B crag or nearby gym if wind/rain/heat ramps up
- Respect and stewardship:
- Pack out all trash, brush tick marks, keep noise low
- Greet locals, park legally, and stick to marked paths
Faqs: Permits, Insurance, Courses, and Grades
Do I need permits to climb in these areas?
Most sport crags don’t require individual permits, but some parks regulate vehicle access or close sectors seasonally for nesting. La Pedriza, for example, can have regulated parking; read on-site signs and local authority websites before you go.
Is insurance necessary for beginner climbing trips?
It’s strongly recommended. A federation license or outdoor sports insurance can cover rescue and liability; verify coverage for climbing, both indoor and outdoor. Check exclusions (e.g., soloing, DWS) and emergency procedures in Spain (112).
How do I choose a good beginner course (“curso de iniciación”)?
Look for certified guides or instructors, small group ratios (ideally 1
–6), and a curriculum covering knots, belaying, cleaning anchors, and safe lowering. Ask about gear included, route grades (3–5+), and cancellation for bad weather; compare options and confirm on Picuco.
How do climbing grades work for beginners?
Spain commonly uses the French sport scale: from 3 (very easy) upward to 6a (moderate) and beyond. Bouldering uses the V scale (e.g., V0–V2 for starters). Grades are guidance, not guarantees; outdoor routes often feel harder than gym equivalents.
Do I need quickdraws and a rope on my first outdoor day?
If you’re on a guided or pre-rigged top-rope day, often no; the guide provides them. If you plan to lead or set your own top-ropes, bring a rope of suitable length and 10–12 quickdraws, plus a helmet and anchor materials.
Are helmets really necessary on easy routes?
Yes. Helmets protect from rockfall and dropped gear and are part of standard outdoor practice for both climber and belayer.
Book your experience — explore outdoor activities across Spain with Picuco-verified providers.
Conclusion
Starting smart is more important than starting strong. Focus on safe habits, clear commands, and routes that let you breathe and learn, and “climbing for beginners Spain” becomes a series of rewarding weekends rather than a single, daunting leap. Use the comparison of modalities to set a weekly rhythm, build a modest kit, and pick from eight destinations that balance access, beginner grades, and welcoming local communities.
One calm exhale at the anchor and the quiet view over a valley remind you why you came.
Your next step is simple and practical: choose a modality to begin this week, then plan one outdoor day in the coming month at a crag that fits your season and grade. Keep our checklist on your phone, and open the interactive map to set a Plan A and Plan B. If you prefer structured learning, compare rock climbing courses in Spain, confirm group size and curriculum, and reserve a date that matches your goals. Whether you’re heading for sunlit slabs in La Pedriza, village-side routes in Chulilla, or limestone terraces above Cornudella, start early, stay conservative, and grow with every pitch. The rock—and a welcoming community that stewards it—will be there when you’re ready.